
Add to Your Site | Netlify CMS
Open source content management for your Git workflow
You can adapt Netlify CMS to a wide variety of projects. It works with any content written in markdown, JSON, YAML, or TOML files, stored in a repo on GitHub, GitLab, or Bitbucket. You can also create your own custom backend.
This tutorial guides you through the steps for adding Netlify CMS to a site that's built with a common static site generator, like Jekyll, Hugo, Hexo, or Gatsby. Alternatively, you can start from a template or dive right into configuration options.
App File Structure
A static admin folder contains all Netlify CMS files, stored at the root of your published site. Where you store this folder in the source files depends on your static site generator. Here's the static file location for a few of the most popular static site generators:
| These generators | store static files in |
|---|---|
| Jekyll, GitBook | / (project root) |
| Hugo, Gatsby, Nuxt, Gridsome, Zola, Sapper | /static |
| Next | /public |
| Hexo, Middleman, Jigsaw | /source |
| Spike | /views |
| Wyam | /input |
| Pelican | /content |
| VuePress | /.vuepress/public |
| Elmstatic | /_site |
| 11ty | /_site |
| preact-cli | /src/static |
If your generator isn't listed here, you can check its documentation, or as a shortcut, look in your project for a css or images folder. The contents of folders like that are usually processed as static files, so it's likely you can store your admin folder next to those. (When you've found the location, feel free to add it to these docs by filing a pull request!)
Inside the admin folder, you'll create two files:
admin
 ├ index.html
 └ config.yml
The first file, admin/index.html, is the entry point for the Netlify CMS admin interface. This means that users navigate to yoursite.com/admin/ to access it. On the code side, it's a basic HTML starter page that loads the Netlify CMS JavaScript file. In this example, we pull the file from a public CDN:
<!doctype html>
<html>
<head>
  <meta charset="utf-8" />
  <meta name="viewport" content="width=device-width, initial-scale=1.0" />
  <title>Content Manager</title>
</head>
<body>

  <script src="https://unpkg.com/netlify-cms@^2.0.0/dist/netlify-cms.js"></script>
</body>
</html>
In the code above the script is loaded from the unpkg CDN. Should there be any issue, jsDelivr can be used as an alternative source. Simply set the src to https://cdn.jsdelivr.net/npm/netlify-cms@^2.0.0/dist/netlify-cms.js
The second file, admin/config.yml, is the heart of your Netlify CMS installation, and a bit more complex. The Configuration section covers the details.
Installing with npm
You can also use Netlify CMS as an npm module. Wherever you import Netlify CMS, it automatically runs, taking over the current page. Make sure the script that imports it only runs on your CMS page. First install the package and save it to your project:
npm install netlify-cms-app --save
Then import it (assuming your project has tooling for imports):
import CMS from 'netlify-cms-app'

CMS.init()

CMS.registerPreviewTemplate('my-template', MyTemplate)
Configuration
Configuration is different for every site, so we'll break it down into parts. Add all the code snippets in this section to your admin/config.yml file.
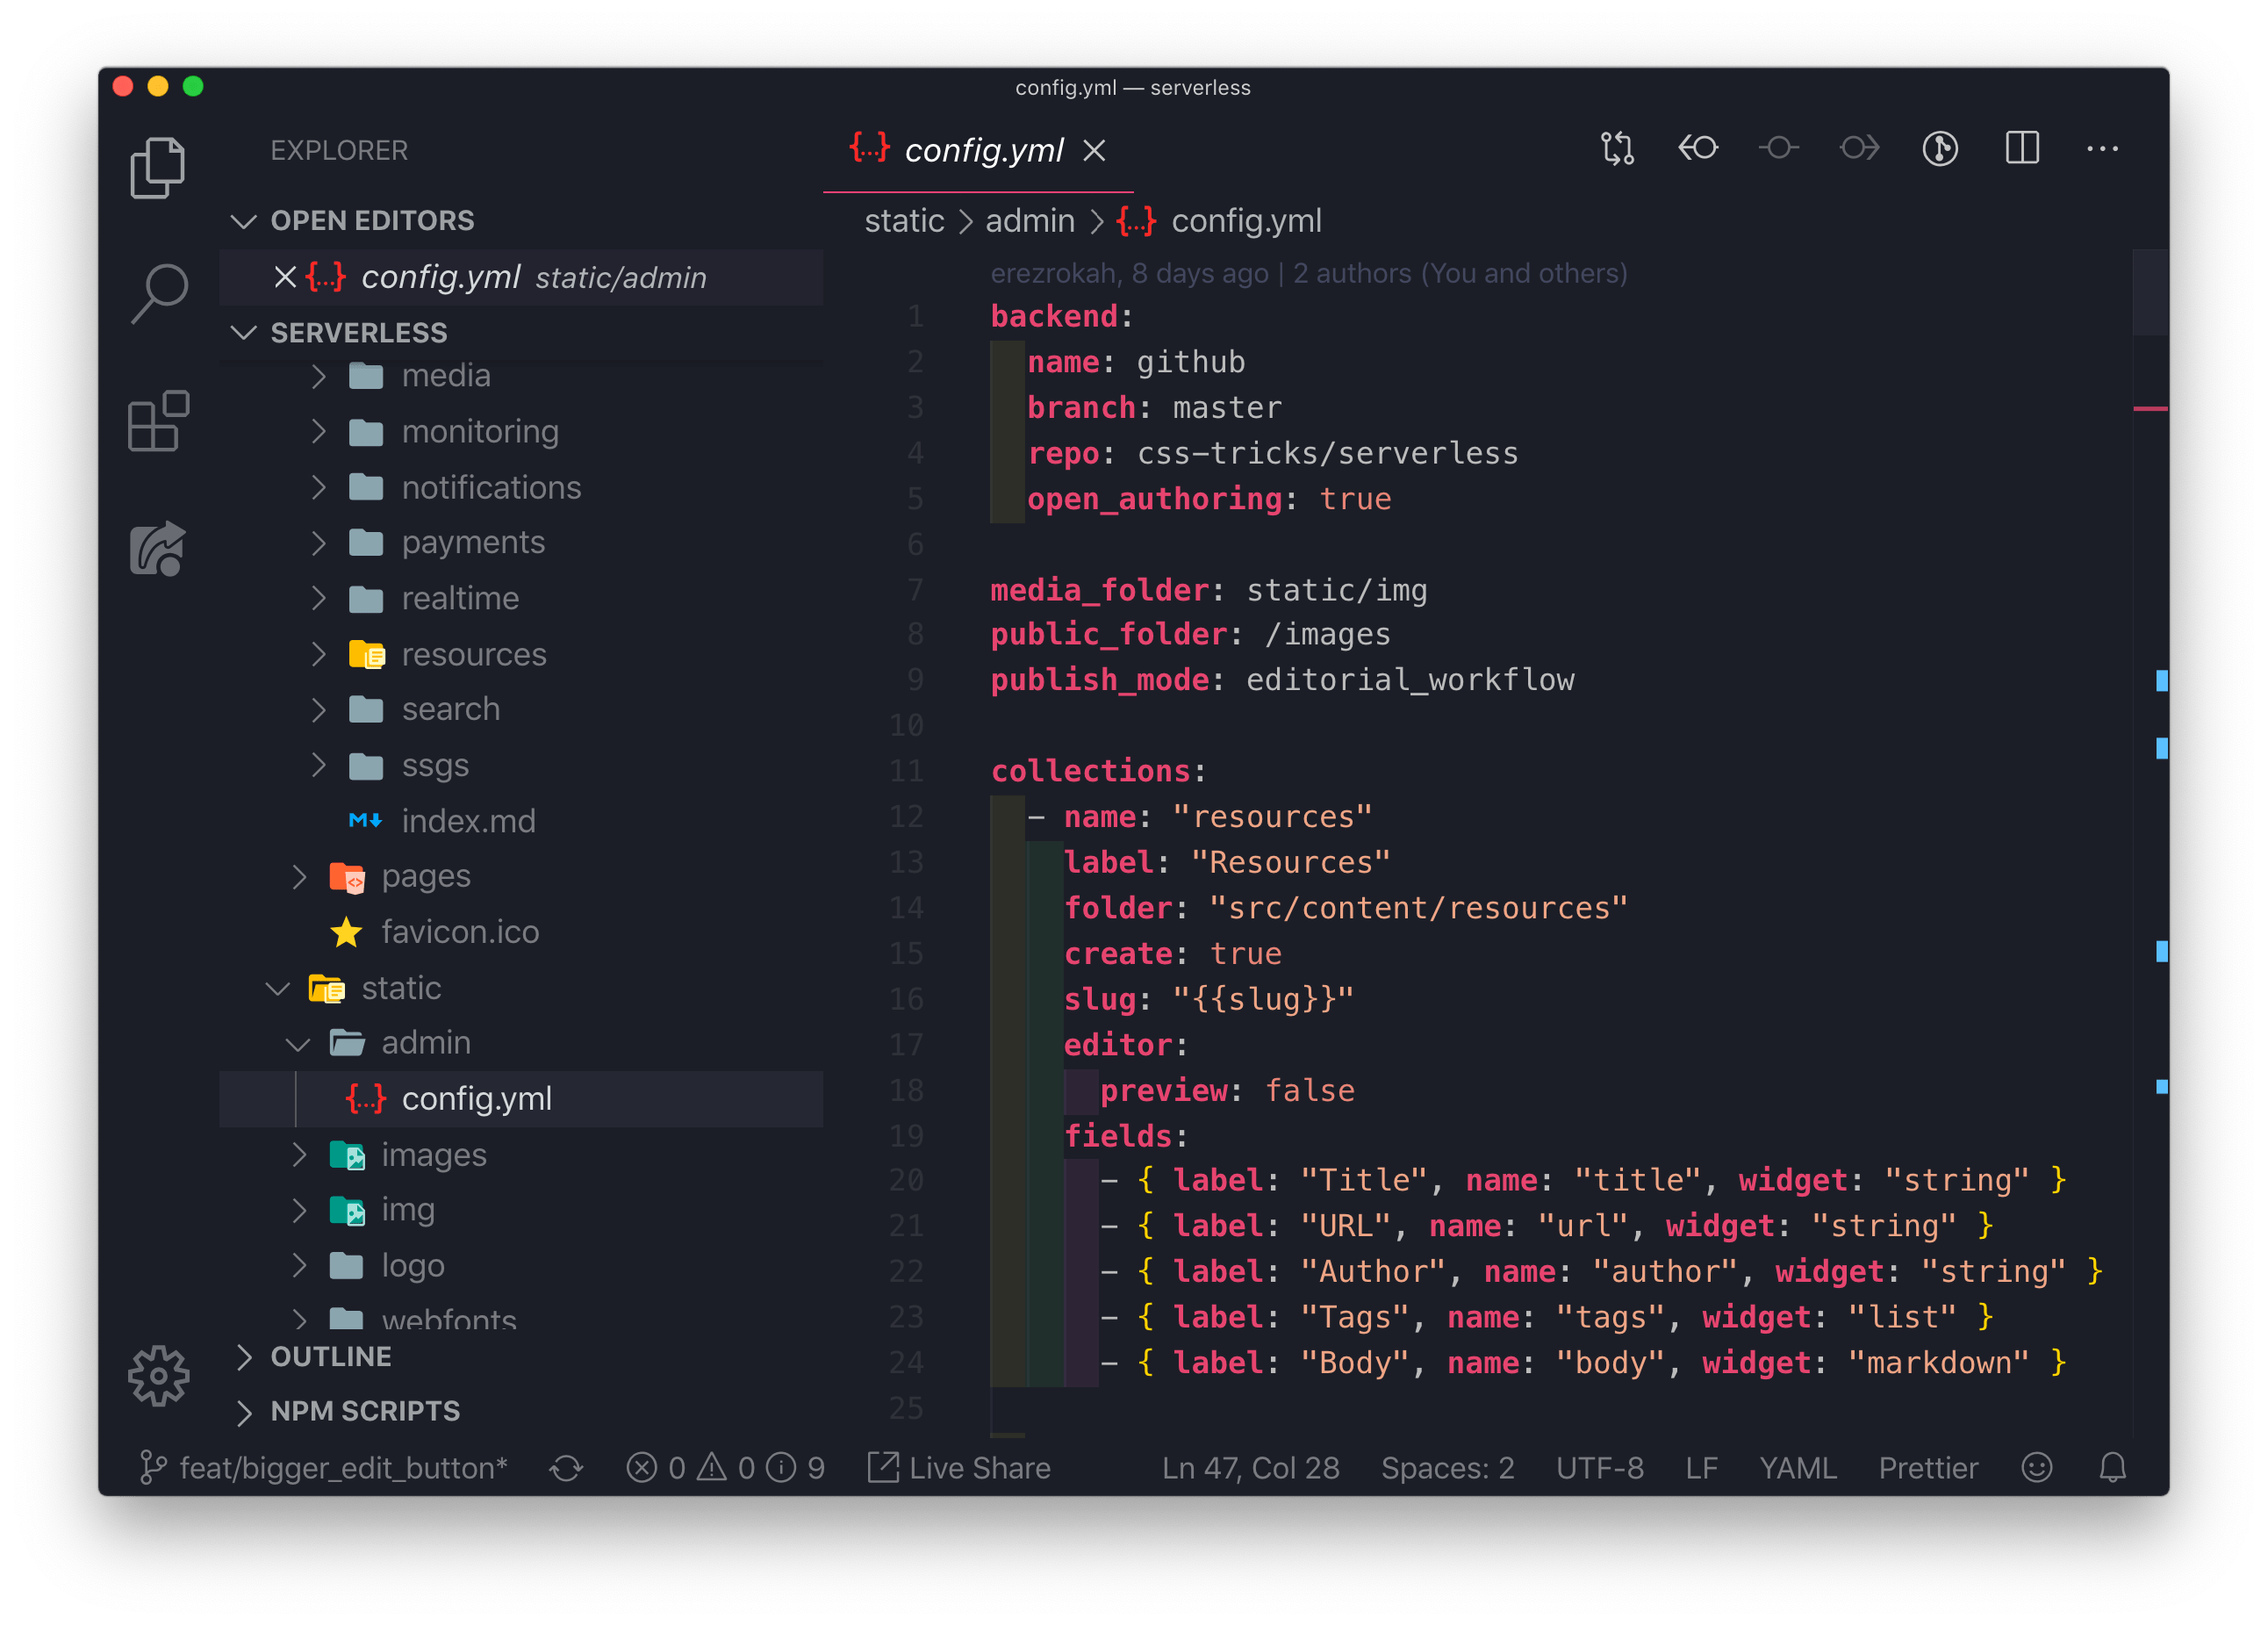
Backend
We're using Netlify for our hosting and authentication in this tutorial, so backend configuration is fairly straightforward.
For GitHub and GitLab repositories, you can start your Netlify CMS config.yml file with these lines:
backend:
  name: git-gateway
  branch: master
(For Bitbucket repositories, use the Bitbucket backend instructions instead.)
The configuration above specifies your backend protocol and your publication branch. Git Gateway is an open source API that acts as a proxy between authenticated users of your site and your site repo. (We'll get to the details of that in the Authentication section below.) If you leave out the branch declaration, it defaults to master.
Editorial Workflow
Note: Editorial workflow works with GitHub repositories, and support for GitLab and Bitbucket is in beta.
By default, saving a post in the CMS interface pushes a commit directly to the publication branch specified in backend. However, you also have the option to enable the Editorial Workflow, which adds an interface for drafting, reviewing, and approving posts. To do this, add the following line to your Netlify CMS config.yml:
publish_mode: editorial_workflow
Media and Public Folders
Netlify CMS allows users to upload images directly within the editor. For this to work, the CMS needs to know where to save them. If you already have an images folder in your project, you could use its path, possibly creating an uploads sub-folder, for example:
media_folder: "images/uploads"
If you're creating a new folder for uploaded media, you'll need to know where your static site generator expects static files. You can refer to the paths outlined above in App File Structure, and put your media folder in the same location where you put the admin folder.
Note that themedia_folder file path is relative to the project root, so the example above would work for Jekyll, GitBook, or any other generator that stores static files at the project root. However, it would not work for Hugo, Hexo, Middleman or others that store static files in a subfolder. Here's an example that could work for a Hugo site:
media_folder: "static/images/uploads"
public_folder: "/images/uploads"
The configuration above adds a new setting, public_folder. While media_folder specifies where uploaded files are saved in the repo, public_folder indicates where they are found in the published site. Image src attributes use this path, which is relative to the file where it's called. For this reason, we usually start the path at the site root, using the opening /.
If `publicfolderis not set, Netlify CMS defaults to the same value asmediafolder, adding an opening/` if one is not included.
Collections
Collections define the structure for the different content types on your static site. Since every site is different, the collections settings differ greatly from one site to the next.
Let's say your site has a blog, with the posts stored in _posts/blog, and files saved in a date-title format, like 1999-12-31-lets-party.md. Each post begins with settings in yaml-formatted front matter, like so:
---
layout: blog
title: "Let's Party"
date: 1999-12-31 11:59:59 -0800
thumbnail: "/images/prince.jpg"
rating: 5
---

This is the post body, where I write about our last chance to party before the Y2K bug destroys us all.
Given this example, our collections settings would look like this in your NetlifyCMS config.yml file:
collections:
  - name: "blog"
    label: "Blog"
    folder: "_posts/blog"
    create: true
    slug: "{{year}}-{{month}}-{{day}}-{{slug}}"
    fields:
      - {label: "Layout", name: "layout", widget: "hidden", default: "blog"}
      - {label: "Title", name: "title", widget: "string"}
      - {label: "Publish Date", name: "date", widget: "datetime"}
      - {label: "Featured Image", name: "thumbnail", widget: "image"}
      - {label: "Rating (scale of 1-5)", name: "rating", widget: "number"}
      - {label: "Body", name: "body", widget: "markdown"}
Let's break that down:
name | Post type identifier, used in routes. Must be unique. |
label | What the admin UI calls the post type. |
folder | Where files of this type are stored, relative to the repo root. |
create | Set to true to allow users to create new files in this collection. |
slug | Template for filenames. {{year}}, {{month}}, and {{day}} pulls from the post's date field or save date. {{slug}} is a url-safe version of the post's title. Default is simply {{slug}}. |
fields | Fields listed here are shown as fields in the content editor, then saved as front matter at the beginning of the document (except for body, which follows the front matter). Each field contains the following properties:
|
As described above, the widget property specifies a built-in or custom UI widget for a given field. When a content editor enters a value into a widget, that value is saved in the document front matter as the value for the name specified for that field. A full listing of available widgets can be found in the Widgets doc.
Based on this example, you can go through the post types in your site and add the appropriate settings to your Netlify CMS config.yml file. Each post type should be listed as a separate node under the collections field. See the Collections reference doc for more configuration options.
Filter
The entries for any collection can be filtered based on the value of a single field. The example collection below only shows post entries with the value en in the language field.
collections:
  - name: "posts"
    label: "Post"
    folder: "_posts"
    filter:
      field: language
      value: en
    fields:
      - {label: "Language", name: "language"}
Authentication
Now that you have your Netlify CMS files in place and configured, all that's left is to enable authentication. We're using the Netlify platform here because it's one of the quickest ways to get started, but you can learn about other authentication options in the Backends doc.
Setup on Netlify
Netlify offers a built-in authentication service called Identity. In order to use it, connect your site repo with Netlify. Netlify has published a general Step-by-Step Guide for this, along with detailed guides for many popular static site generators, including Jekyll, Hugo, Hexo, Middleman, Gatsby, and more.
Enable Identity and Git Gateway
Netlify's Identity and Git Gateway services allow you to manage CMS admin users for your site without requiring them to have an account with your Git host or commit access on your repo. From your site dashboard on Netlify:
- Go to Settings > Identity, and select Enable Identity service.
- Under Registration preferences, select Open or Invite only. In most cases, you want only invited users to access your CMS, but if you're just experimenting, you can leave it open for convenience.
- If you'd like to allow one-click login with services like Google and GitHub, check the boxes next to the services you'd like to use, under External providers.
- Scroll down to Services > Git Gateway, and click Enable Git Gateway. This authenticates with your Git host and generates an API access token. In this case, we're leaving the Roles field blank, which means any logged in user may access the CMS. For information on changing this, check the Netlify Identity documentation.
Add the Netlify Identity Widget
With the backend set to handle authentication, now you need a frontend interface to connect to it. The open source Netlify Identity Widget is a drop-in widget made for just this purpose. To include the widget in your site, add the following script tag in two places:
<script src="https://identity.netlify.com/v1/netlify-identity-widget.js"></script>
Add this to the <head> of your CMS index page at /admin/index.html, as well as the <head> of your site's main index page. Depending on how your site generator is set up, this may mean you need to add it to the default template, or to a "partial" or "include" template. If you can find where the site stylesheet is linked, that's probably the right place. Alternatively, you can include the script in your site using Netlify's Script Injection feature.
When a user logs in with the Netlify Identity widget, an access token directs to the site homepage. In order to complete the login and get back to the CMS, redirect the user back to the /admin/ path. To do this, add the following script before the closing body tag of your site's main index page:
<script>
  if (window.netlifyIdentity) {
    window.netlifyIdentity.on("init", user => {
      if (!user) {
        window.netlifyIdentity.on("login", () => {
          document.location.href = "/admin/";
        });
      }
    });
  }
</script>
Note: This example script requires modern JavaScript and does not work on IE11. For legacy browser support, use function expressions (function () {}) in place of the arrow functions (() => {}), or use a transpiler such as Babel.
Accessing the CMS
Your site CMS is now fully configured and ready for login!
If you set your registration preference to "Invite only," invite yourself (and anyone else you choose) as a site user. To do this, select the Identity tab from your site dashboard, and then select the Invite users button. Invited users receive an email invitation with a confirmation link. Clicking the link will take you to your site with a login prompt.
If you left your site registration open, or for return visits after confirming an email invitation, access your site's CMS at yoursite.com/admin/.
Note: No matter where you access Netlify CMS — whether running locally, in a staging environment, or in your published site — it always fetches and commits files in your hosted repository (for example, on GitHub), on the branch you configured in your Netlify CMS config.yml file. This means that content fetched in the admin UI matches the content in the repository, which may be different from your locally running site. It also means that content saved using the admin UI saves directly to the hosted repository, even if you're running the UI locally or in staging.
Happy posting!
GitHub | Netlify CMS | Open-Source Content Management System
Open source content management for your Git workflow
For repositories stored on GitHub, the github backend allows CMS users to log in directly with their GitHub account. Note that all users must have push access to your content repository for this to work.
Because Github requires a server for authentication, Netlify facilitates basic GitHub authentication.
To enable basic GitHub authentication:
- Follow the authentication provider setup steps in the Netlify docs.
Add the following lines to your Netlify CMS
config.ymlfile:backend: name: github repo: owner-name/repo-name
Specifying a status for deploy previews
The GitHub backend supports deploy preview links. Netlify CMS checks the context of a commit's statuses and infers one that seems to represent a deploy preview. If you need to customize this behavior, you can specify which context to look for using preview_context:
backend:
  name: github
  repo: my/repo
  preview_context: my-provider/deployment
The above configuration would look for the status who's "context" is "my-provider/deployment".
Netlify CMS Open Authoring
I like the term "Git-backed CMS." That term works for an emerging style of CMS that looks and behaves much like any other CMS, with a fascinating twist:
I like the term "Git-backed CMS." That term works for an emerging style of CMS that looks and behaves much like any other CMS, with a fascinating twist: it doesn't actually store any data for you. These CMSs are connected to a Git repo where the data lives in flat files (e.g. Markdown). You teach the CMS where those files are and how they are structured. Then, as you use the CMS to create, edit, and delete things, those changes happen as commits (or pull/merge requests) are made against that repo. So cool.
For example, CloudCannon can do it specifically for hosted Jekyll sites.
But more in the Indie Web / JAMstack spirit, there are players like Forestry and the one I have the most experience with: Netlify CMS.
Lemme do a series of screenshots with captions to make the point very clear.

The site in question is our Serverless site. It happens to be Gatsby, but the important part is that that the content comes from Markdown files in a Git repo.

Here's an example Markdown file (with Frontmatter) in the repo. I like Markdown fine, but I'd prefer to work with content in a GUI CMS honestly. The reason I went this way is so the data is in a repo, meaning I can take content-based pull requests.

I really do get content-based pull requests. That's the magic right there. That's exactly what I want.
Netlify CMS is basically two files. An index.html that loads up a SPA interface that literally does everything. And a configuration file to teach it about your content.

With Netlify CMS in place, I have my GUI CMS happy place. Any changes in here turn up as commits on the repo.
OK OK OK. What's this "Open Authoring" thing?
As I write, it's a beta feature.
Here's the main thing: I can use Netlify CMS for my site. My team can also use it, because I can invite them specifically to the repo. But you, random person on the internet, cannot. If you wrote to me and told me you wanted to be a volunteer content manager on the site, then maybe, OK, I'll invite you to the repo. (You being a member of the repo will allow you to auth into Netlify CMS, assuming you are using the GitHub back end, which is the only connection Open Authoring works with right now.)
But that's a bummer that random internet people can't submit pull requests on content via Netlify CMS. That would be way easier than the manual process of forking the repo and all that jazz — although to be fair, click the little pencil icon while looking at a Markdown file on GitHub and editing it makes the process pretty simple by opening a pull request automatically (but it doesn't help you add new content or upload images or anything).
This is where Open Authoring comes in. In my Netlify CMS config I can basically flip it on with one line of config. They explain it well:
you can use Netlify CMS to accept contributions from GitHub users without giving them access to your repository. When they make changes in the CMS, the CMS forks your repository for them behind the scenes, and all the changes are made to the fork. When the contributor is ready to submit their changes, they can set their draft as ready for review in the CMS. This triggers a pull request to your repository, which you can merge using the GitHub UI.
Emphasis mine.
Wanna see the real beauty of this? Now we can put "Edit this" buttons on all the content, and if you click it, you'll head straight into Netlify CMS to do the editing. It works if you are me, my team member, or you, random person from the internet.

That's what I've always wanted. It makes the site into a wiki! But there is enough public accountability (they have to use a real GitHub account) that I wouldn't worry about much spam or obnoxious behavior.
Open Authoring | Netlify CMS
Open source content management for your Git workflow
This is a beta feature.
When using the GitHub backend, you can use Netlify CMS to accept contributions from GitHub users without giving them access to your repository. When they make changes in the CMS, the CMS forks your repository for them behind the scenes, and all the changes are made to the fork. When the contributor is ready to submit their changes, they can set their draft as ready for review in the CMS. This triggers a pull request to your repository, which you can merge using the GitHub UI.
At the same time, any contributors who do have write access to the repository can continue to use Netlify CMS normally.
Requirements
You must use the GitHub backend.
Note that the Git Gateway backend does not support Open Authoring, even when the underlying repo is on GitHub.
For private GitHub repos the user must have
readaccess on the repo, and you must explicitly set the auth_scope torepo, for example:backend: name: github repo: owner-name/private-repo-name authscope: repo openauthoring: true
- Enable the editorial workflow by setting
publish_modetoeditorial_workflowin yourconfig.yml. Set
open_authoringtotruein thebackendsection of yourconfig.yml, as follows:backend: name: github repo: owner-name/repo-name open_authoring: true
Usage
When a user logs into Netlify CMS who doesn't have write access to your repo, the CMS asks for permission to create a fork of your repo (or uses their existing fork, if they already have one). They are then presented with the normal CMS interface. The published content shown is from the original repo, so it stays up-to-date as changes are made.
On the editorial workflow screen, the normal three columns are replaced by two columns instead — "Draft" and "Ready to Review".
When they make changes to content in the CMS, the changes are made to a branch on their fork. In the editorial workflow screen, they see only their own pending changes. Once they're ready to submit their changes, they can move the card into the "Ready To Review" column to create a pull request. When the pull request is merged (by a repository maintainer via the GitHub UI), Netlify CMS deletes the branch and removes the card from the user's editorial workflow screen. Open Authoring users cannot publish entries through the CMS.
Users who do have write access to the original repository continue to use the CMS normally. Unpublished changes made by users via Open Authoring are not visible on the editorial workflow screen, and their unpublished changes must be merged through the GitHub UI.
Alternative for external contributors with Git Gateway
As noted above, Open Authoring does not work with the Git Gateway backend. However, you can use Git Gateway on a site with Netlify Identity that has open registration. This lets users create accounts on your site and log into the CMS. There are a few differences, including the following:
- Users don't need to know about GitHub or create a GitHub account. Instead, they use Netlify Identity accounts that are created on your site and managed by you.
- The CMS applies users' changes directly to your repo, not to a fork. (If you use the editorial workflow, you can use features like GitHub's protected branches or Netlify's locked deploys to prevent users from publishing directly to your site from the CMS.)
- There is no distinction between users with write access to the repo and users without — all editorial workflow entries are visible from within the CMS and can be published with the CMS. (Unpublished Open Authoring entries, on the other hand, are visible only to the author in the CMS UI or publicly as GitHub PRs.)
Linking to specific entries in the CMS
Open authoring often includes some sort of "Edit this page" link on the live site. Netlify CMS supports this via the edit path:
/#/edit/{collectionName}/{entryName}
For the entry named "general" in the "settings" file collection
https://www.example.com/path-to-cms/#/edit/settings/general
For blog post "test.md" in the "posts" folder collection
https://www.example.com/path-to-cms/#/edit/posts/test
collectionName: the name of the collection as entered in the CMS config.entryName(for file collections: thenameof the entry from the CMS config.entryName(for folder collections: the filename, sans extension (the slug).